Rustic Italian Bread: 7 Secrets for Perfect Homemade Loaves
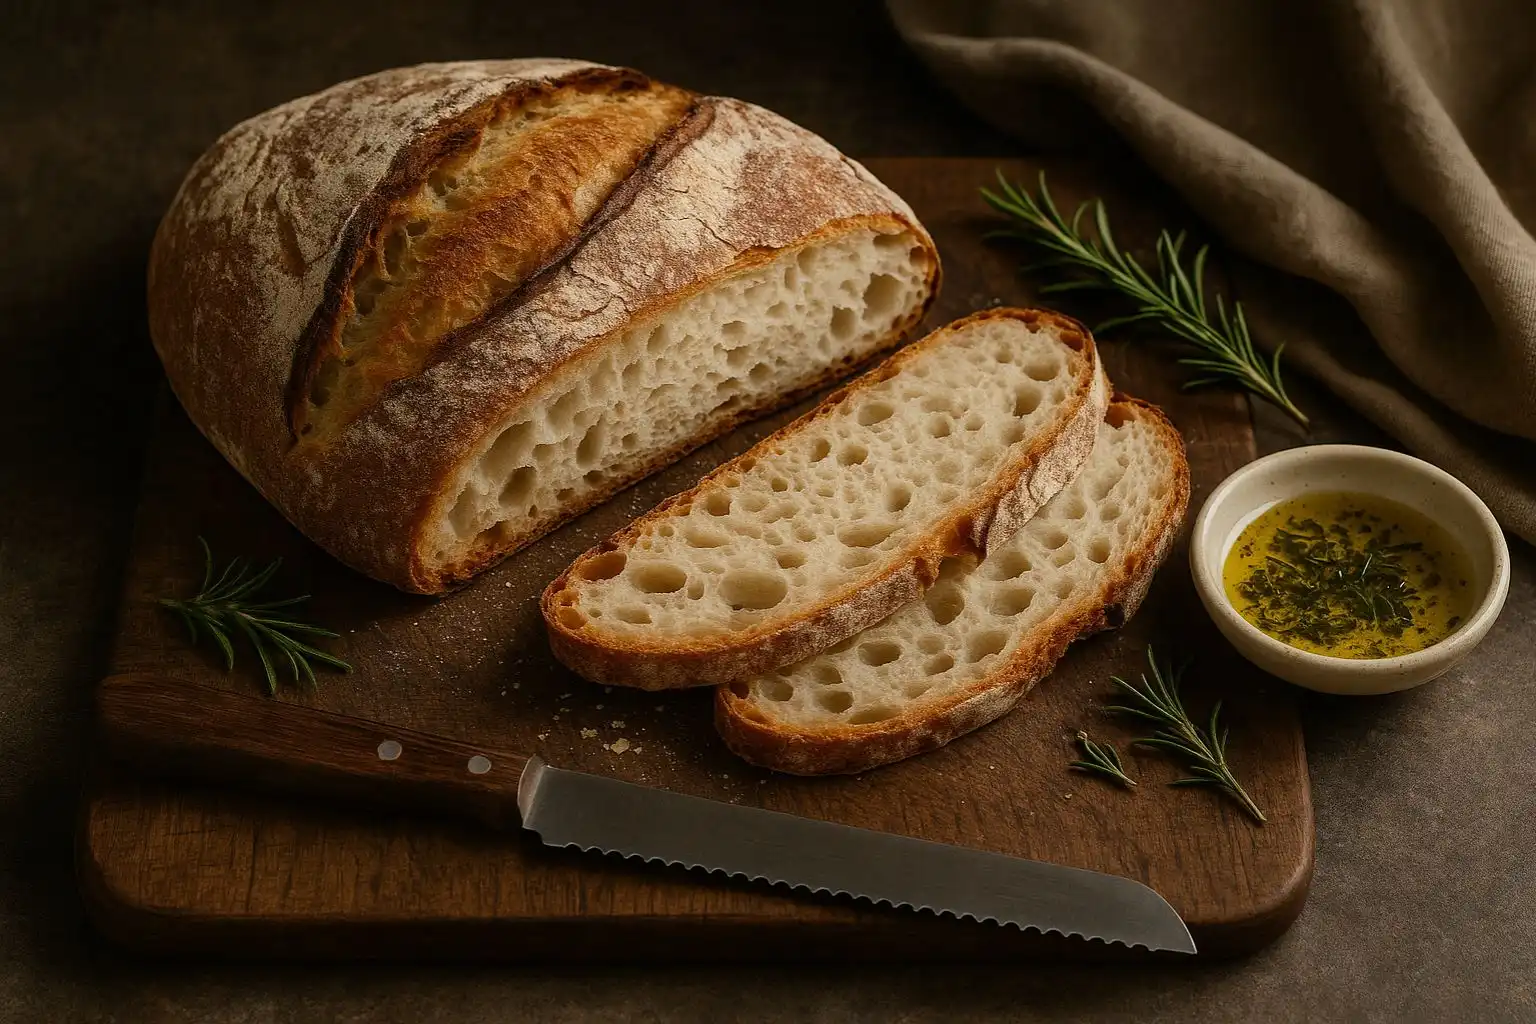
Imagine this: pulling a golden-brown loaf of rustic Italian bread from your oven. You hear the crackle of the crust as it cools. You cut into it (after waiting, promise!) and see big, beautiful air pockets inside. That first bite? Pure magic. Crunchy outside, soft and chewy inside, with a taste that’s simple but amazing. That’s the magic of authentic rustic Italian bread. Sure, you can buy bread at the store. But trust me, making your own rustic Italian bread at home is a whole different level of delicious. It’s fresher, tastier, and oh-so-satisfying to bake. Plus, your kitchen will smell incredible! Let’s unlock the secrets to baking your perfect loaf.
Table of Contents
The Foundation: Essential Tools & Ingredients
Before we dive into the secrets, let’s gather our simple supplies. Good rustic Italian bread needs just a few key things.
Non-Negotiable Ingredients
The beauty of rustic Italian bread is its simplicity. You only need four things:
- Flour: This is the star! You need flour with lots of protein to make strong gluten (that’s the stretchy stuff that gives bread its structure and chewy bite). Look for:
- Bread Flour: Easier to find, perfect for beginners. (High protein content!)
- Italian “00” Flour: Super-fine Italian flour, amazing for authentic texture. (“Doppio Zero” or “Tipo 00”).
- Water: Good quality water is best. Temperature matters! Usually lukewarm water wakes up the yeast nicely.
- Salt: Sea salt or kosher salt adds essential flavor and strengthens the dough. Don’t skip it!
- Yeast: The tiny powerhouse that makes the bread rise! You can use active dry yeast or instant yeast (sometimes called rapid-rise). Instant yeast is often easier as you mix it right in with the flour.
That’s it! Just flour, water, salt, and yeast. Simple, right?
Tools You’ll Need
You don’t need a fancy kitchen, but a few tools make baking rustic Italian bread much easier:
- Large Mixing Bowl: For mixing and letting your dough rise.
- Kitchen Scale (Highly Recommended!): Baking is a science. Measuring flour by weight (grams or ounces) is WAY more accurate than cups. This makes a huge difference!
- Bench Scraper/Dough Cutter: This handy tool helps you handle sticky dough, divide it, and clean your counter. Super useful!
- Dutch Oven (Cast Iron or Enameled): This is the SECRET WEAPON for that amazing crust! It traps steam perfectly. A 5-7 quart size is ideal for a round loaf (a boule).
- Linen Cloth (Couche) or Clean Kitchen Towel: For gently supporting your shaped dough during its final rise. Linen is best as it doesn’t stick much, but a thick cotton towel dusted well with flour works too.
- Sharp Knife or Razor Blade (Lame): For making clean, deep cuts (scoring) right before baking. This helps the bread expand beautifully.
- Parchment Paper: Makes transferring your dough into the hot Dutch oven safe and easy.
Secret #1: Flour Choice Matters Most
Think of flour as the building blocks of your rustic Italian bread. Using the right kind is the first big secret to success!
- Why Protein is King: Bread needs gluten. Gluten forms when flour mixes with water. It’s like stretchy rubber bands inside the dough. Strong gluten traps the gas bubbles made by yeast, creating those lovely big holes in your bread (the “crumb”) and giving it that satisfying chew.
- Bread Flour: This is your reliable best friend. It’s widely available and has a high protein content (usually 12-14%). It creates strong gluten for great oven spring (that final puff when it bakes) and a chewy texture. Perfect for beginners and pros!
- Italian “00” Flour (Tipo 00): This is the traditional flour used in Italy. It’s milled super fine, like baby powder! While some “00” flours are for pasta or pizza, look for ones labeled specifically for bread (often called “Manitoba” or with high protein, around 12-13%). It makes an incredibly tender yet chewy crumb and a slightly more delicate crust. It feels magical to work with!
- What NOT to Use: Regular all-purpose flour often doesn’t have enough protein. Your dough might feel weak, and the bread could turn out dense or flat. Save the AP flour for cookies!
Bottom Line: For amazing homemade rustic Italian bread, grab bread flour or authentic Italian “00” bread flour. It makes all the difference in structure and chew!
Secret #2: Master the Hydration Ratio
“Hydration ratio” sounds fancy, but it just means how much water you use compared to the flour. Getting this right is the second secret to that dreamy, hole-filled inside (the “open crumb”) of your rustic Italian bread.
- What is Hydration? It’s the weight of the water divided by the weight of the flour, shown as a percentage. For example, 500g flour + 350g water = 70% hydration (350 / 500 = 0.7).
- The Sweet Spot: Authentic rustic Italian bread usually has hydration between 70% and 75%. This means for every 100g of flour, you use 70-75g of water.
- Why Higher Hydration?
- Open Crumb: More water creates more steam inside the dough as it bakes. This steam helps create those beautiful, large air pockets you love.
- Crispier Crust: The extra moisture contributes to a fantastic crackly crust.
- The Trade-Off: Wetter dough (higher hydration) is stickier and trickier to handle! It feels shaggy and loose at first. Don’t panic! This is normal for great rustic Italian bread.
- Tips for Handling Hydrated Dough:
- Use Your Scale! Accuracy is key here.
- Don’t Add Extra Flour! Resist the urge! Too much flour makes bread tough and dense. Use wet hands or your bench scraper to handle it.
- Trust the Process: Techniques like stretch-and-fold (coming up next!) help manage sticky dough and build strength without adding flour.
Start Simple: If you’re new, try a recipe around 70% hydration. As you get comfortable handling stickier dough, you can gradually increase towards 75% for an even more open crumb in your rustic Italian bread.
Secret #3: Slow Fermentation = Deep Flavor
This is where the magic really happens! Secret number three is all about patience. Slow fermentation is the key to unlocking incredible flavor in your rustic Italian bread, far beyond what quick rises can achieve.
- What is Fermentation? This is when the yeast eats the sugars in the flour and burps out carbon dioxide (making bubbles!) and alcohol. It’s the rising process.
- Fast vs. Slow: A quick rise (1-2 hours at room temp) gets the job done, but the flavor is mild. A slow fermentation, especially a cold fermentation, gives the yeast and natural enzymes in the flour much more time to work.
- Why Go Slow (and Cold)?
- Deep, Complex Flavor: Time allows more flavor compounds to develop. Think nutty, slightly sweet, tangy notes – real depth!
- Better Texture: Slow fermentation improves the dough’s strength and elasticity, leading to a better rise and a more tender, chewy crumb.
- Convenience: Do most of the work the day before! Mix your dough, let it rest briefly, then pop it in the fridge overnight (12-24 hours). Bake it when you’re ready the next day. Easy!
- How to Do It (Cold Bulk Fermentation):
- Mix your dough as usual.
- Let it rest at room temperature for about 1 hour (this is the “bulk fermentation” start).
- Cover the bowl tightly (plastic wrap works well) and put it in the refrigerator.
- Let it sit slowly fermenting for at least 12 hours, or up to 24-48 hours for even more flavor!
- The next day, take it out, shape it, let it do its final rise, and bake!
Patience Pays Off: Giving your rustic Italian bread dough this slow, cold rest is the single biggest thing you can do to make it taste like it came from an Italian bakery. The flavor difference is amazing!
Secret #4: Hand Kneading vs. Stretch-and-Fold
You’ve mixed your dough. Now it needs strength! Secret number four is about building that strong gluten network. You have two main options for your rustic Italian bread: traditional kneading or the gentler stretch-and-fold. Let’s compare!
Traditional Kneading Technique
This is the classic method you probably picture: pushing, folding, and turning the dough on a floured surface.
- How it Works: You work the dough continuously for about 10-15 minutes. You push it away with the heel of your hand, fold it over, turn it, and repeat. It’s a workout!
- Goal: Develops gluten quickly through friction and mechanical action.
- Pros: Familiar method, can be satisfying, works well for lower-hydration doughs.
- Cons: Can be hard on your hands/wrists. Easy to add too much extra flour if the dough is sticky (which you don’t want for high-hydration rustic Italian bread!). Can sometimes tear the developing gluten if you’re too rough.
Modern Stretch-and-Fold Alternative
This technique is gentler and often preferred for higher-hydration rustic Italian bread doughs. It mimics kneading but in stages.
- How it Works (Simple Version):
- Let your mixed dough rest for 15-30 minutes (this is the “autolyse” – helps hydration!).
- Wet your hands. Grab one side of the dough in the bowl, gently stretch it upwards as far as it easily goes without tearing.
- Fold this stretched part over the top of the dough mass.
- Turn the bowl a quarter turn and repeat: stretch and fold.
- Do this 4 times (once on each “side”).
- Cover the bowl and let it rest for 30 minutes.
- Repeat the whole set of 4 stretches and folds 2-4 more times over the next 1-2 hours (before your cold fermentation or final rise).
- Goal: Gently aligns and strengthens the gluten strands without degassing the dough too much.
- Pros: Excellent for sticky, high-hydration doughs (you use wet hands, not flour!). Less physical effort. Helps create an open crumb. Can be done right in the bowl.
- Cons: Takes longer overall (resting periods between sets).
Recommendation: For beginners tackling rustic Italian bread, especially with higher hydration, stretch-and-fold is often easier and gives better results! It’s less messy and helps you avoid adding too much flour. Give it a try!
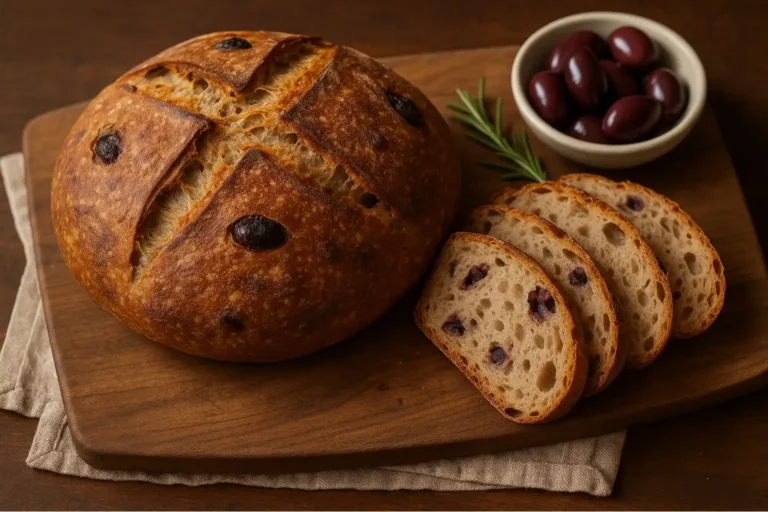
Secret #5: Shaping for Authenticity
Your dough has fermented beautifully. Now it’s time for secret number five: shaping! Proper shaping gives your rustic Italian bread its classic round or oval look and, more importantly, creates essential surface tension.
- Why Shape?
- Structure: Shaping organizes the bubbles and creates a tight “skin” on the dough.
- Surface Tension: This tight outer layer is crucial! It helps the loaf hold its shape during the final rise and gives it that powerful upward “oven spring” when it hits the heat, instead of spreading out flat.
- Classic Look: Creates the beautiful boule (round) or batard (oval) shape of authentic rustic Italian bread.
- Gentleness is Key: Handle the dough gently! You want to preserve as many of those lovely gas bubbles inside as possible. No punching down!
- The “Stitching” Technique (Basic Boule):
- Lightly flour your work surface. Gently tip your dough out.
- Use your bench scraper to fold the dough in half towards you.
- Gently pull the top edge down and tuck it underneath slightly. Rotate the dough a bit.
- Pull the right side over and tuck it underneath. Rotate.
- Pull the bottom edge up and tuck it underneath. Rotate.
- Pull the left side over and tuck it underneath.
- Now, with both hands cupped gently around the sides of the dough, slowly drag it towards you on the unfloured part of the counter. The friction will help tighten the bottom (seam side) and create a smooth, taut top. Rotate 90 degrees and repeat 1-2 times.
- Place it seam-side UP in your proofing basket (banneton) or seam-side DOWN on a floured towel in a bowl for its final rise.
Visuals Help! Shaping is much easier to understand by seeing it. Imagine gently tucking the edges underneath to create a smooth, tight ball. This surface tension is vital for your rustic Italian bread to rise tall and proud!
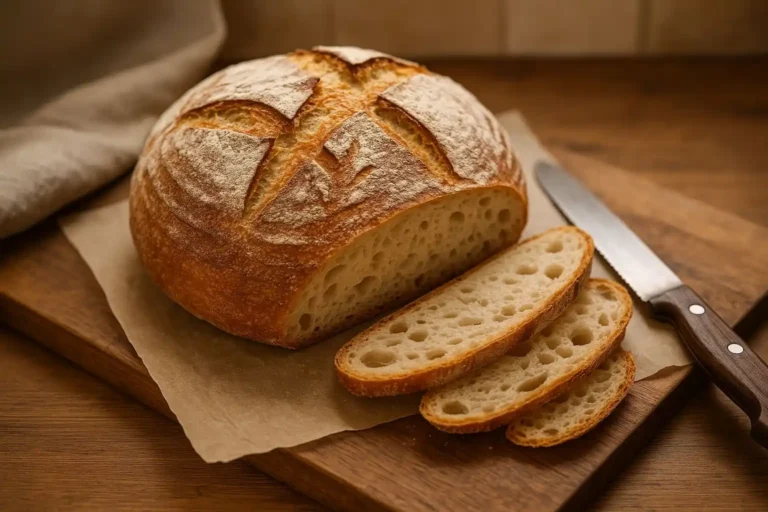
Secret #6: Steam Is Your Crust’s Best Friend
That incredible, shatteringly crisp, golden crust on rustic Italian bread? Secret number six is all about steam in the oven!
- Why Steam? During the first 10-15 minutes of baking, steam does two amazing things:
- Delays Crust Setting: It keeps the dough surface moist and flexible, allowing the loaf to expand to its full potential (maximum oven spring!). Without steam, the crust sets too quickly, limiting the rise.
- Creates the Perfect Crust: As the steam evaporates later in the bake, it leaves behind that signature thin, crisp, crackly, and beautifully caramelized crust we love.
- How to Create Steam at Home (Easy Methods):
- The Dutch Oven Method (BEST & EASIEST): This is the gold standard for home bakers. Preheat your Dutch oven (lid ON) inside your regular oven for at least 30 minutes. Carefully place your dough (on parchment paper) into the scorching hot Dutch oven, put the lid back on, and bake. The small, enclosed space traps the dough’s natural steam perfectly! Bake covered for 20-30 minutes, then uncover to finish browning.
- The Spray Bottle Hack: If baking on a stone or tray, create steam manually. Right after loading your bread, quickly spray the oven walls (avoid light bulbs and glass doors!) and the dough itself with water 5-10 times. Close the door FAST! Repeat once more after 2 minutes. Be careful of the hot steam! Tossing a few ice cubes onto a preheated baking sheet on the oven floor also works.
- Oven-Safe Pan of Water: Place a heavy, oven-safe pan (like a cast iron skillet) on the bottom rack while preheating. When you load the bread, carefully pour about 1 cup of boiling water into the hot pan. Close the door quickly! Creates good steam but less intense than a Dutch oven.
For Guaranteed Results: Use a Dutch oven! It makes achieving that perfect, professional-level crackly crust on your rustic Italian bread almost foolproof.
Secret #7: The Cooling Test
You’ve baked a gorgeous loaf! The smell is incredible. The crust is crackling. You desperately want to slice it open… RESIST! Secret number seven is all about patience (again!). Proper cooling is non-negotiable for perfect rustic Italian bread.
- What’s Happening Inside? When the bread first comes out of the oven, the baking process isn’t actually finished. The inside is still cooking from the trapped heat (this is called “carryover cooking”). The starches are still setting, and moisture is redistributing.
- The Big Mistake: Slicing too soon! Cutting into hot bread releases all that precious steam trapped inside.
- The Consequences:
- Gummy Texture: The crumb (inside) will be wet, sticky, and gummy instead of light and airy.
- Squished Loaf: Without the set structure, your beautiful loaf can collapse or become dense.
- Stale Faster: Moisture escapes rapidly, making the bread go stale much quicker.
- The Golden Rule: Let your rustic Italian bread cool COMPLETELY on a wire rack. Minimum 2 hours. For larger loaves, 3 hours is even better.
- Why a Wire Rack? It allows air to circulate all around the loaf, preventing the bottom crust from getting soggy.
- The Reward: Waiting gives you:
- Perfect Texture: A crisp crust and a tender, well-set, airy crumb.
- Full Flavor: Flavors continue to develop as it cools.
- Clean Slices: It won’t tear or squish when you cut it.
The Ultimate Test: Listen for the “singing”! As it cools, you might hear faint crackling sounds from the crust. That’s a sign of a great bake! Wait for it… your patience will be deliciously rewarded with perfect rustic Italian bread.
Troubleshooting Common Mistakes
Even with the secrets, sometimes bread doesn’t turn out perfectly. Don’t worry! Here’s how to fix common rustic Italian bread issues:
Dense Crumb?
- Problem: The inside is heavy, with few or very small holes.
- Likely Causes & Fixes:
- Under-proofed: Dough didn’t rise enough. Next time, let it ferment/shape proof longer (watch dough, not just the clock! It should look puffy). Warmer spot?
- Over-proofed: Dough rose too long, collapsed. Yeast ran out of steam. Next time, reduce rising time or use cooler spot/fridge.
- Too Low Hydration: Not enough water. Measure carefully by weight! Try slightly higher hydration next time.
- Handled Too Roughly: Degassed the dough (knocked out bubbles) during shaping. Be gentler!
- Incorrect Flour: Used low-protein flour (like AP). Use bread flour or “00” bread flour.
Pale Crust?
- Problem: The crust is soft, pale, or lacks that deep golden-brown color.
- Likely Causes & Fixes:
- Not Enough Steam: Steam is crucial for crust development! Ensure your steam method (Dutch oven, spray, water pan) is effective. Preheat Dutch oven fully.
- Oven Too Cool: Oven temp might be inaccurate. Use an oven thermometer! Preheat longer (45-60 mins). Bake at 450°F (230°C) or higher.
- Baked Too Short: Loaf needed more time uncovered to brown. Extend uncovered baking time by 5-10 minutes.
- Scoring Too Deep/Shallow?: Experiment with depth and pattern of your cuts.
Flat Loaf?
- Problem: The bread spread out sideways instead of rising upwards. Looks pancake-like.
- Likely Causes & Fixes:
- Weak Gluten: Under-kneaded or under-stretched. Ensure proper gluten development (windowpane test). Use higher protein flour. More stretch-and-folds.
- Poor Shaping / Lack of Surface Tension: Shaping didn’t create a tight “skin”. Practice the stitching/folding technique to build tension.
- Over-proofed: Dough exhausted, lost structure. Proof less next time. Dough should spring back slowly when gently poked.
- Insufficient Oven Spring: Likely due to lack of steam (see Pale Crust fixes) or oven not hot enough. Ensure powerful initial heat blast.
Serving & Storing Your Masterpiece
You did it! Your perfect rustic Italian bread is baked and cooled. Time to enjoy!
- Serving Ideas (Simple is Best!):
- Tear & Share: Just tear off chunks! It’s fun and rustic.
- Dipping: Pour some high-quality extra virgin olive oil onto a plate, maybe add a splash of balsamic vinegar, dried herbs, or pepper. Dip away!
- Soup’s Best Friend: Dunk it into minestrone, pasta e fagioli, or lentil soup. Heavenly!
- Sandwiches: Makes incredible panini (grilled sandwiches) or simple bruschetta (toasted slices topped with tomatoes, basil, garlic).
- Cheese & Charcuterie Board: A must-have alongside cheeses and cured meats.
- Breakfast: Toast thick slices and top with butter, jam, or ricotta and honey.
- Storing Your Bread (Keep it Crisp!):
- Short Term (1-2 Days):Do NOT use plastic! Plastic bags trap moisture and make the crust soggy. Instead:
- Place the cut side DOWN on a wooden cutting board.
- Or, store it whole in a paper bag at room temperature. The paper allows some moisture out, keeping the crust reasonably crisp longer than plastic.
- Longer Term (Up to a Month): Slice the cooled bread. Freeze slices in a freezer bag. When ready to eat, pop frozen slices directly into the toaster or a 350°F (175°C) oven for a few minutes until warm and crisp.
- Reviving Stale Bread: If the crust softens, refresh slices in a 350°F (175°C) oven for 5-10 minutes. Stale bread is also perfect for breadcrumbs, croutons, or panzanella (bread salad)!
- Short Term (1-2 Days):Do NOT use plastic! Plastic bags trap moisture and make the crust soggy. Instead:
Ready to Bake? Start Your Journey!
There you have it – the 7 secrets to baking incredible, authentic rustic Italian bread right in your own kitchen! It might seem like a lot at first, but focus on one secret at a time. Start with good flour, embrace the slow rise, try stretch-and-fold, shape with care, use steam (Dutch oven!), and always let it cool. Remember, practice makes progress, not perfection. Every loaf is a learning experience (and usually still delicious!).
Don’t wait! Find a trusted recipe (look for one using these secrets!), gather your simple ingredients, and bake your first loaf this weekend. Imagine that moment you pull your own beautiful, crackling rustic Italian bread from the oven. Pure joy!
I want to hear about your baking adventures! Did you try these secrets? How did your loaf turn out? What questions popped up? Share your photos, triumphs, and questions in the comments below! Let’s build a community of happy home bakers. Happy Baking!